 the non-silicone fabrics with confidence, tapes for the silicone fabrics remain a problem. The state of the art for silicone adhesives is still evolving.
Send any questions or comments to the designer Roger Caffin
Much of my philosophy on tents is a reaction to the very small rectangular dome tents and low tapered tents you see around, (not to mention the fun you can have with a bivvy bag in pouring rain!). These small tents have just enough room inside for one or two sleepers, but very little room for their wet gear or doing anything. What you do if it is freezing cold and pouring rain I do not know. Reading some trip reports and watching some campers, I gather one person gets inside and does nothing while the other sits outside in the rain and cooks. This reminds me of a couple we saw in the Pyrenees with such a dome tent. It was pouring rain but there he was, crouched over his stove outside, trying to cook dinner. Eventually the couple had to pick the tent up (I suppose their gear was inside it) and move it away from the hollow they were in: the hollow was filling up with water. For very little extra weight I can be inside my tent, sitting on an insulated mat, cooking in comfort in dry clothing while my wife sorts the gear out and gets into her sleeping bag.
| Contents | |
|---|---|
|
The tents I have described here have been for sale but at present I have ceased production: it wasn't economic. However, things may change if I can get a company to take up the designs. They are very lightweight. They involve precision designs and superb materials, but if you want to treat them brutally they will suffer damage, and fail at an embarrassing time. (So what's new?) I accept no responsibility for what you make or what you do with them. Treat them with care, erect them with care, and maintain them with care, and I believe they should last a long time.
What you get here are my ideas for ultra-lightweight tents, without compromises. I use some terms interchangeably: 'outer tent' 'fly' and 'roof' for instance. This matters, as some Americans call the inner tent 'the tent', and call the outer tent the fly. They put mosquito netting in the roof of the inner tent, and go camping without the fly. Direct entry for rain without the fly! Apparently they can rely on it not raining for extended periods, and they have to look at the stars at night. (Me, I go to sleep.) Anyhow, this is what I think is needed for our conditions.
The need for ventilation covers both hot and cold weather. In each case you need an air inlet low down and an air outlet high up - as high as possible. It helps to have the inlet up-wind as well, but this is partly a question of what sort of tent site you pick. It also helps if you can control the amount of ventilation a bit. Granted, in some cases you wish you could stop the ventilation from going through the tent quite so fast. Even a narrow gap around the bottom at the windward end is plenty of ventilation in summer.
The condensation problem did not really exist when we used cotton japara fabric for the tent: it breathed moisture out very well. It just let heavy rain come inwards as well. With very light PU proofing on nylon you could sometimes get the tent breathing enough to minimise condensation under most conditions, but the new silicone-coated fabrics are too waterproof for this to happen. Condensation is possible with either of these, but more so with the silicone fabric. Epic fabrics are treated with silicone but do breathe, and might be exoected to make good tent flys. However, the water pressure rating on them is not so good, and under heavy rain the fabric eventually wets out and tthe leaks like a sieve. Freezing cold weather and a long dinner being cooked adds a little moisture as well, although the plume of steam coming out of the top vent can be quite amazing! Curiously, this plume does not seem to add much condensation: I think the hot air from the stove keeps the fabric warm enough. Anyhow, the design of the tent should steer any drips which do occur to land outside the groundsheet space. This affects the design of the side walls and the top ventilation in particular.
Now we have to convert my requirements into design features. These features are where one can have lots of fun, but they must meet the above requirements. You will get further comments in the Summer tent page and the Winter tent page. There is also a quite detailed and lengthy set of articles at Backpacking Light on the design and pitching of Tunnel Tents: Part 1, Introduction and pitching and Part 2, more details, with links to mini-reviews of many tunnels. I had better warn you that I wrote these truly excellent articles ... For the rest of this page I will mainly be talking about my chosen tent - the tunnel. I largely skip the silly pop-up domes and the heavy geodesic domes.
I have made and/or used all of these designs. From sad (wet) experience in bad weather, I prefer designs where the fly or roof is nearly vertical near the ground. Roofs that slope down at an angle have a bad tendency to flatten under bad weather, and that usually gets everything underneath wet. Tarps that do not come right to the ground allow storms underneath the edges far too easily. On the other hand, wigwams either have a center pole which gets in the way, or need too many poles (imho). The dome can be very spacious, but the poles are always long and bendy, and can buckle in high winds. The tunnel is rather more robust under bad weather - and I always design for bad weather. We took a 2.1 metre square dome I designed and built through SW Tassie in the 1960s many times, and it was huge. It slept 3 or 4 people nicely, but it suffered a little under bad weather and it was sometimes difficult finding a suitable tent site for something that big and square. These days I favour the tunnel tent, at least for one or two people. By the way, the reported virtue of being able to separate the inner and outer tents for carrying may have had some value when the tent weighed over 10 kg, but today it is just "marketing spin". Don't do it, and ignore the spin.
I don't think a tunnel tent has to be completely symmetrical. I have had no problem using a tent which has a door at only one end. I have never had much problem finding a site which allowed me to point the closed end more or less into the wind. However, those tents which are tapered way down at one end (or both ends) under the guise of a more aerodynamic shape or a weight saving are a waste of money. I don't think the designers have ever experienced bad weather in them. In some cases, I question whether they have ever even slept in a tent. The low end(s) can only be used for your feet: what if the ground is sloping the other way? In extreme cases I have seen the top of the quilt brushing against the roof - and the condensation there. When we get into our tent we expect to be able to get changed and cook and eat there, and low ends are a real pain for this. I have looked at the purported weight saving you get: it is actually quite small. So some asymmetry is fine, but there must be headroom at each end. On the other hand, too much height is extra weight and wind resistance.

Some manufactures make a big deal of how they have reduced the weight of the tent by making one end very low. If you are using very heavy fly materials this might be significant, but with light-weight materials it isn't. On the other hand, the disadvantages of a very low end on the tent are huge, especially for a two-man tent. A low end is unusable for normal living: both people have to be at the high end, getting in each other's way. It can make that end of the tent low on ventilation and low on warm air (it's all up the other end), so that lots of condensation forms down there. All of this might make you think I don't like the concept, and you would be right. We (my wife and I) think there should be enough room to sit up anywhere in the tent, which for us means a minimum of 200 mm width at 900 mm above the ground. However, if it's a one-man tent you can have one lowish end without the same problem. Not too low or you get condensation problems of course.
By the way, if you want to really experience the disadvantages of a low tent, try sitting up in the early morning in a low tent in the snow, after a night of -10 C or lower. There will be a layer of hoar-frost on the inside of the inner tent above your head. When your head brushes against this the frost will fall down the back of your neck.
When I was a little Boy Scout we pitched our Japara (tightly-woven long-staple Egyptian cotton) A-frame tents using sticks we found at the camp site. This does not always work in the mountains, especially above the tree line. Too many of our trees have only badly twisted branches as well. Of course, an A-frame tent is not very storm-worthy anyhow, so that design is of historical interest only now. Some people carry lots of trekking poles and use them as tent poles, but the rest of us carry real tent poles. So my designs do use dedicated tent poles. It allows more design freedom, and more location freedom too. Of course, an A-frame tent is not very storm-worthy anyhow, so that design is of historical interest only now.
If you want the poles to go from one side of the tent to the other in a smooth curve, then they have to be able to bend into quite a tight circle with a small radius to get nearly 180 degrees of bend. However, this is usually too much of a bend for a straight pole to handle safely: it goes beyond the elastic limit. Bend and straighten aluminium poles too far and too often, and they can work harden and snap: I speak from (sad) experience. The 7178 alloy Easton briefly experimented with was especially bad in this regard: very strong, but far too brittle. Bend a carbon fibre pole too much and it will fail, equally catastrophically. Been there, done that as well. The 'bang' was incredible. You can solve this problem for aluminium poles by putting a "pre-bend" into the pole. That way the amount of flex added each time you pitch the tent is within the elastic range. As to why (and how) you can put a permanent severe bend into an alluminium alloy pole without harming it - that's a very complex story for another day.

However, I have not found a way of putting pre-bends into carbon fibre poles yet, and I am fairly sure that it is actually just not possible, so tight curves are out for them. The reason for this is tied up with the way the CF poles are made. Bulk aluminium alloy can be forced into some flow, but carbon fibres will not stretch to any significant degree at all: that's why CF is so strong after all. And trying to compress the fibres lengthwise is equally impossible.
People who know nothing about the subject regularly suggest making the pole on a curved former. What a wonderfull idea ... or so it sounds. In fact, you can do this but there are two problems. The first is how do you get a very tight 2D wrap around such a thin former with a very clumsy manual lay-up? It can't be done. The second problem is how do you get the long thin curved former out from inside the hard pole once the stuff has cured solid? Good Luck with that one!
However, you can use carbon fibre poles for tent if you have a point at the top of the tent. You might get a 40 degree bend in each pole and a 90 degree bend at the top: that gives you 170 degrees of bend, which is enough. This means the tent has a point at the top - a little like an old-fashioned A-frame tent. In fact, this works very well, and has some distinct advantages as well. You would normally have a seam along the top: this adds strength. The ridge is also good at shedding the rain, better than a flat top. I have used this idea for some time. More recently, I have used three bends rather than just one. Since the bends are very small and light (and strong), they do not affect the overall weight much, but having more bends creates much greater headroom. A set of poles for this are shown here, with the elbows.
I have listed the method of attaching the pole to the fly as a serious design issue, and this needs some explanation. You can put the poles into sleeves in the roof of the tent (the fly), or you can have the poles essentially free-standing. In the latter case the inner tent usually hangs from the poles by hooks, and the fly is thrown over the poles. We call that sort of tent a 'pop-up', you would be right in detecting some derision in the term. The free-standing design sounds great and is used in lots of (cheap and not-so-cheap) American tents, but it is a total disaster in bad weather. If there is a strong wind the lengthy poles can slide around, twist into unintended serpentine shapes and let the tent collapse. That is, provided you were able to get the tent up in the first place in the wind. But in pouring rain this overall design excels as a rainwater tank. There you are with the inner tent spread out in the pouring rain while you put the poles into place. Only after the inner tent is at least partly up can you put the fly over it all. Now you get to bale the water out of the groundsheet. This design is suitable for some areas in America where they KNOW it is not going to rain for 6 months of the year; it is not suitable for anywhere else.
However, if the poles go in sleeves in the fly all these problems are at least partly solved. The poles cannot move with respect to the fly, so the whole tent is far more stable. And you pitch the tent by spreading the whole unit out in one piece, even if it is pouring rain. After all, if the fly is on top, who cares if it gets wet? It is meant for this. Once the tent goes up the water runs off the fly, and the inner tent and groundsheet can be still quite dry.
The poles have to be anchored at the ends. This is normally done by having a 'pole foot' at each end, and this pole foot normally goes into an eyelet which is attached, somehow, to the groundsheet. You sit on the groundsheet, that keeps the poles in place, and that keeps the roof in place. You add guy ropes to stop the poles from moving too much, and to keep the poles down when you are not in the tent (and there is a howling gale blowing). A gross over-simplification of the whole matter, but never mind. It is also normal to tie the edge of the fly down at the pole foot too. Some use adjustable webbing for this; I use bungee cord. Both work fine, but the bungee cord makes it much easier to get the pole foot into the eyelets. If you want the lower edge to be very close to the ground for a snow tent, then you may have to use a sod cloth of some sort.
How many poles you have depends on the sort of weather you expect. For summer tents in the lowlands two poles are usually enough, but three poles are better if you are going up into the mountains. For winter tents at least three poles are needed to give enough support to the roof to take bad weather and snow, although having four poles is really superb. This is illustrated by the two designs given in this section - summer and winter. Yes, there are commercial tunnel tents with four poles - but not from America. Of course, the extra poles have weight, but with lightweight carbon fibre poles it isn't that much. The extra guy ropes on the extra poles help too - some might say are utterly crucial.
One of the problems with creating a tent design with a CAD system is that sometimes the real world construction doesn't quite come out the same. Materials behave differently from expected, or you just overlook some aspect of fabric behaviour. And so it proved with the interaction between the poles and the roof. The simplistic idea is that the poles should sit at the design point: a join line or ridge for instance. The trouble is that this is usually at a seam, and a seam is stronger than the surrounding fabric. So the pole moves somewhere else, where it can stretch the fabric a bit more. Many manufacturers put the pole in a loose internal sleeve. This is the easiest design to make, but you can never be too sure exactly where the pole will end up. Not quite where you wanted it, usually. You can solve this, as some manufacturers do, by making the roof highly scalloped, so the pole is constrained by major changes in fabric dimension. The macpac olymous is a leading example of this. The down side is that this requires either significantly longer poles (more weight) or entails a serious loss of headroom inside. The 'maximum tent height' ceases to be a good guide to the inside dimensions.
I worried about this for some time and looked at various possibilities. One interesting idea is to put the pole sleeve on the outside of the roof. This works very well for the mechanical engineering and also makes setting up fairly easy, but makes it a bit harder to waterproof the roof seams, especially with the silnylon fabrics. If you put the sleeve on the inside, the question remains just what sort of sleeve should it be. It could be genuinely part of the roof or it could be a bit attached at one edge to the inside. When the sleeve is loosely attached (at the edge of the sleeve), the location of the pole is still a bit variable. This can weaken the structure in bad weather. I devised a way of integrating the pole sleeve into the tent roof, such that there are seams on either side of the pole. This constrains the pole position nicely, but I was never really happy with it.
Eventually I moved to having an external pole sleeve, and this has worked wonderfully ever since. In practice I found that the main constraint on the sleeve is that it is not too large. That of course leads to the question of how large the sleeve should be. Obviously, it must allow the pole to be threaded through easily, but there is little need for it to be much bigger. I can say with experience that a narrow pole sleeve can be a serious problem at sub-zero temperatures. Somewhere between 20 and 30 mm across seems about right.
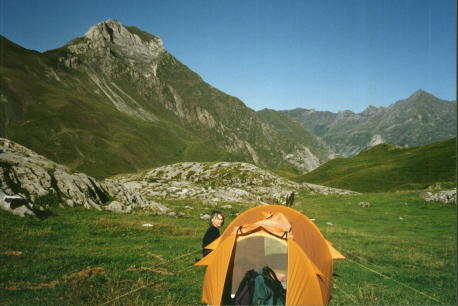
The vestibule is the space at the end, between the groundsheet and the fly. It needs to be large enough that you can squeeze inside it to strip off wet clothing before you get onto the groundsheet. You really do not want muddy clothing, let alone muddy footwear, in your sleeping area. You can get away with one large vestibule at the lee end of the tent, but in this case it must have room for you, your wet gear, your packs, and cooking as well. Yes, that is a pile of very wet clothing in the right hand corner in the picture above. It had been raining all day.
I used to go for two vestibules in a two-man tent so we can put the packs out of the way at the windward end. Having the packs at the windward end of the tent can also block some of the wind, and even help hold the tent up under really extreme weather. There is a penalty for this: for a double-skin tent you need a small door at the downwind end so you can retrieve gear out of your pack or access the pack for packing up in wet weather. (You surely don't stand outside in the pouring rain to pack, do you?) For my winter tents I have moved to pushing the groundsheet towards the windward end and having a single large down-wind vestibule. it works very well.
In the case of a one-man tent you can get away with a single good vestibule, and this fits in very nicely with the rest of the ergonomics.
Allied to the tent height and vestibule space questions is the width of the groundsheet at the main door end. While it is not listed above, I have found it very convenient to be able to sit across the end of the groundsheet just inside the doorway, so I can cook in the down-wind vestibule. The distance from your feet to your back is not that great, so this is fairly easy to achieve.
We have the fairly fundamental question of single or double skin. You might think this should come first, but it actually interacts a bit with other decisions. A double skin weighs more: that is obvious, but it does have advantages. If there is condensation on the inside of the fly an inner tent can shed this whe it drips down, as long as the inner tent has a good DWR teatment of course. If there is a strong wind blowing (OK, let's say a howling snow storm), an inner tent can be sealed up and reduce that wind to negligable. Mind you, we have seen snow pile up on the inner tent under those conditions: a hazard in its own right. (Give it a whack before it melts: it wil slide off.) If the inner tent is not strictly waterproof it shouldn't get condensation inside it (you hope), under mild conditions.
This leads to a delicate balance between water proofing and condensation for the inner tent, which can be handled rather nicely by a good factory-applied Durable Water Repellent (DWR) coating. This doesn't work entirely when it's way sub-zero: your breath turns into hoar frost as soon as it hits the inside of the tent. Ah well, nothing is perfect. An inner tent can add several degrees of warmth to the night - a valuable boost in the snow. This comes about in two ways: an actual temperature drop across the fabric, and a blocking of the cold winds from reaching you, your face, amnd your quilt. What this all means is that a double skin tent is needed in winter in the snow, but is not really needed elsewhere.
Doorways on tents come in a couple of styles. The really bad designs put the top of the doorway over the groundsheet, so any leaks through the zip land on the groundsheet. (Pop-ups are notorious for this fault.) This makes it very difficult to get into a tent in bad weather of course: as soon as you open the door the rain pours in on your gear. Good doorways stay away from the groundsheet, and this means there is some merit in having the top of the poles tilted away from the centre of the tent. You will see this in my designs. It makes the design mathematics more difficult, but never mind.
Good doorways allow you to vary the size of the opening for good and bad weather. This is commonly done by varying the amount you undo the zip from the top down. It is also very nice sometimes to be able to unzip the door all the way, so the entire door is on the ground. This is quite common in the snow, when it is too cold in the morning to lean right across the vestibule to a bottom zip slider. (Have I got a thing about getting frost down the neck? Yep.)
In the beginning... I used a rubberised canvas cape-groundsheet, ex-army. I think it also stopped .303" bullets. We can do slightly better today. I am assuming that you do clear your tent site of sharp and lumpy objects before you put the tent up: such things can both damage any groundsheet and are uncomfortable to sleep on. Some manufacturers sell "footprints" for their tents: an extra groundsheet shaped to the tent outline, probably heavy weight, to protect the real ground sheet. I made one of these, but didn't used it more than once or twice. They are extra weight, and they are not proof against a sharp spike anyhow. Clear the site!
The groundsheet has sides which I bring up a fair way (120 - 150 mm) to stop floods and splashing. This adds a small amount of weight - but a wet quilt adds a lot more. One time at Medlow Gap off NarrowNeck the rain was so heavy the ground had over 10 mm of water flowing across it, and some splashes were getting onto the mosquito netting inner wall more than 100 mm up under the fly. But those sorts of conditions are rare (maybe!). It is possible to put the groundsheet together with no sewing at ground level - a comforting thought with 10 mm of water around you. However, it can be useful to sew the pole anchors to the groundsheet, and seam-sealing the stitching with sealant is very simple and effective. I have done that for years.
If you are looking at the American tarp tents, be warned! Not all of them even have groundsheets, and those that do usually have flat groundsheets. That's right: no sidewalls at all. I suspect the reason is that the vendors know the tarps won't take storms very well, so they deliberately give you a flat groundsheet to ensure that you are rather selective about where you pitch your tent. Of course, they are often camping in the shelter of a huge forest on a very porous ground. I understand the logic, but there is no way I would ever buy such a design for Australian conditions! It would be totally useless. My tents have to be storm-proof, because I sleep in them!
We need to stop insects getting in, otherwise you spend half the night swatting mosquitoes. In some areas the risk of mosquito-borne diseases is rising, making the imperative even greater. Thus both summer and winter tents have mosquito doors. The summer doors are sewn to the tent at the poles and go down to the groundsheet. They overlap in the middle and can be pulled right back to the poles for a large entry. There are netting sidewalls between the groundsheet and the roof as well. The winter tent has to be completely sealed against wind and snow anyhow, but the optional netting door on it is similar in shape to the summer one, for use when the inner door is open. It goes outside the inner door, so you can open and shut that without fumbling through the netting. Both types of tents are thus fully sealed against insects. You could have the netting door open like the winter door, with a zip over the top, if you wanted. The zip weighs extra.
It is possible to have an outer tent door without zips, but you have to use a lot of velcro strips or press-studs. You might save a bit of weight, but not very much as the lighter zips are not very heavy. Actually, I don't think you save any weight at all. Of course, if the tent has to withstand a lot of wind and driving rain or snow, you really do not have much choice: you need a zip. You would be surprised just how good snow is at getting through very small gaps. For the same reason the inner door on the winter tent uses a full-length zip.
This leaves unanswered the question of zip size and type. They come in a wide range of sizes: #3, #5, #8, #10, and three main types of teeth: moulded plastic, moulded metal, and continuous plastic coil. (Yes, there are other variations too.) Many gear makers use the largest zip with the most clunky moulded teeth they can get. Have a look at what they put on some sleeping bags as an example. I think (I have been told by the manufacturers) this is for those people who seem unable to treat any gear with respect, and insist on brutalising zippers. Yank, rip, tear. In contrast, I like to use a small #3 zip with a coil design, for both summer and winter designs. Treated with respect it will last just as well, and it is of course much lighter.
Use of zippers in the snow raises its own problems. If the tape forming the zip gets wet, and freezes overnight, you may have real problems getting the zip open in the morning! This is especially true with the coil design; the moulded tooth is not as susceptible to this problem. However, the moulded tooth zip is not available in the #3 size: only in #5. If you want to use your tent in the snow, spray the zip tape with a good DWR or silicone.

I got tired of trying to stuff a bulky snow-covered tent into a little stuff sack in a howling gale, and decided that there had to be a better way. After some thought I decided that the problem was not so much the small stuff sack per se, but the small hole at the top. A larger hole is needed.
So I made a stuff sack of about the right size but with the hole down the long side. This is shown to the right. Now I just roll the tent up, plonk it on the middle of the stuff sack, and start pulling on the drawcord. As the neck shrinks across the rolled-up tent I stuff protruding bits of the tent back under the edge. Eventually I tie off the drawcord on the loop from the othr side. It works wonderfully.
Designing is fun, but eventually you have to actually make the tent. This means cutting out and sewing materials together. The silicone fabrics are all very slippery, and this makes accurate sewing a bit tricky. It can be done: you just have to pin the pieces together carefully, making sure the pins do not go through the bits which are meant to be waterproof. Use a thin needle (#60) for preference, light industrial thread and a low tension. I use Rasant 120 and Rasant 80 thread: it seems much better than the Gutermann stuff available in the local shops. I guess the latter is cheaper.
However, one of the biggest tricks of the design trade is to try to avoid sewing through the middle of large areas. Handling a huge pile of material while trying to sew an accurate seam is just difficult. Instead I try to always sew at an edge, with all the material off to one side. Now this is not possible when you reinforce a seam, but by then you have the first seam in place, and that controls the fabric. After a few mishaps (bits folding underneath), putting this constraint into the design phase became mandatory, and has been achieved. It just takes care.
You could in fact skip the second line of stitching which reinforces the seam, and rely on the seam sealing tape to bridge the seam, or even just rely on a single line of stitching. Most packs have only a single line of edge stitching, simply because of the difficulties of reinforcing the seam (at a commercial price). Have a look inside your pack and see. This works quite well for a combination of 12 oz canvas and string for thread. However, this just does not work with the very light tent fabrics: the weave is not strong enough and large holes open under load. Where direct tension cannot be avoided (as in the pole seams in my designs), it is usually possible to arrange for extra layers of fabric to help reinforce the seam. This can be a bit fiddly, but I have to sleep in this tent no matter what the weather! As discussed under Seam Sealing, you can compensate in part if you have to have a reliable seam-sealing tape. However, while I can recommend tapes for
the non-silicone fabrics with confidence, tapes for the silicone fabrics remain a problem. The state of the art for silicone adhesives is still evolving.
There is another possibility: use a commercially available silicone sealant as an adhesive for some of the seams - either as a tape or even as a substitute for sewing. You have to be able to pitch the tent somewhere indoors while the sealant cures in place (at least 2 days). Reader Sven did this, and his tent is shown here. The front end is derived from one of my designs, but the back end is Sven's own design. Some of it is sewn, and some is glued. More details of how he designed and built it are given here.
There are two main ways of sealing the stitching in a tent. You can cover the seam with a 'seam seal tape', as found inside the seams of GoreTex and PU/nylon jackets, or you can paint on a sealant. There is a third way: you can have a multi-layer thick seam, and rely on the layers to block the water. But this is clumsy and heavy, and I will skip it.
I have moved a lot of this information to its own Seam Sealing page. One of the American vendors (Six Moon Designs) has a whole web page on this, and it is a good reference site. 'Risk', a member of BackpackGearTest, also has a page on it.
About the biggest issue in creating a new tent, especially an ultra-lightweight one, is the choice of materials. Many of the well-known designs currently on the market use materials which were available 30 years ago. These are not state of the art in material technology. The flip side of using what I call modern materials is the hassle of getting hold of them: they are not quite you would call "mainstream suburban retail". It took me well over a year to source most the materials I wanted, and the quest goes on. I have put some of the more accessible sources on the DIY page. We discuss these in the following section.
Abbreviations and units: "gsm" means grams per square metre. Hardly ISO, but so what. Waterproofness is quoted in terms of the maximum pressure gradient (kPa) a fabric can withstand before showing any leaks. The figures quoted are ones I have measured myself using a pressure-test system I built. For reference, my old Olympus tent fly seems to leak at about 10 kPa. Modern fabrics can do much better. Polyurethane and silicone proofing are much better than cheap common acrylic coating: watch what you buy.
The heaviest fly material I have used is quite interesting stuff. It was originally developed for NASA for high altitude research balloons, and is nominally gas-tight. It is a light nylon with a heavy PU proofing (55 gsm), but the PU layer contains titanium dioxide to make it very UV-resistant. For this reason some gear makers give it names like "titan-tex" or "titanium" or similar. It comes in a bright orange. It comes from Dimension Polyant in America, and is available by the roll. It is good in very wet conditions as it is totally waterproof and can be tape sealed very well. However, the PU proofing gets very stiff in sub-zero conditions, as on snow trips, and the nylon fabric itself can absorb a fair bit of water, making it heavy when wet (and even stiffer when frozen).
The blue material (47 gsm) I was using in my tents is a very soft double-coated nylon fabric, water repellent and waterproof and can be bought from some of the American sources on the DIY page. It is usually referred to as '1.3 oz' material, but this is the base wight of the fabric, not the finished weight. The silicone polymer proofing used handles the cold very well. In addition, the proofing layer seems to actually enhance the strength of the very light parachute fabric used as a base, by spreading the load across more threads than normal. This stuff is what is usually known on the web as 'silnylon'.
Silnylon should really be thought of as a sheet of silicone polymer reinforced with nylon fabric: a reinforced composite. The behaviour is quite different from an ordinary fabric, with a higher tear stength. The old 'wet-look' stuff had a very high water pressure rating (60+ kPa), but the newer 'dry'look' stuff is somewhat less than that. It varies a bit depending on the batch and the supplier. Waterproofing the seams on silnylon is not all that tricky and is discussed under seam-sealing. Note that the tape method adds a little weight - but not much.
A lighter 'silicone' spinnaker fabric at 34 gsm can be obtained from several sources (typically yachting suppliers) but the samples I have tested and used are not as waterproof (~30kPa) and even this rating is not guaranteed. It was designed as an unwettable but light spinnaker fabric, not as a tent fabric. It is rather stiff and crinkly and makes a lot of noise in the wind. I suspect that the proofing is actually a combination of a silicone polymer and polycarbonate (PC). The PC gives the fabric considerable dimensional stability: just what you want in a spinnaker. Creasing of the polycarbonate can present a long-term problem of worse leaks. This fabric is available from several sources here in Australia and overseas, but you should hesitate if you want something for the long term.
There is another quite well-known 'silicone' fabric called Epic, by Nextec, but this Epic fabric does not have many retail sources yet (afaik). There is a big technical difference between 'silnylon' and Epic in how the proofing is done. The Epic fabric has proofed fibres in the threads, but the proofing does not bridge between the threads. The fabric can breathe, but it does not have a high water pressure rating. It has been found to leak under very heavy or very prolonged rain. Under very heavy rain I understand it actually wets out and allows a very fine spray through. It is not sufficiently waterproof for use on a tent for rainy conditions, but is excellent when conditions remain sub-zero in the snow. [Footnote added in 2006: I believe the fabric or the company has been bought by GE.]
The netting I use (19 gsm) is an imported multi-filament knit and fairly resistant to damage - all things being relative of course. It will stop most Australian insects. It comes from overseas: I haven't found anything as good locally. Locally available single filament mesh of a similar weight is available, but is a bit more susceptible to damage: there is only one filament to break. Of course, it is easy enough to repair a tear - albeit rather visible. "No-see-um" mesh (32-40 gsm) from local or overseas suppliers will stop the extremely small but highly carniverous New Zealand sand flies, but it is a bit heavier. In addition, some of it seems to stop the air flow seriously, which is bad in summer, so be a little careful what you buy. If you want to stop the insects but are willing to replace the netting more often, you can use a more fragile organza (9 gsm!). This will snag over time, but it does come in really gorgeous iridescent colours. Kinky!
As mentioned above, 'In the beginning... I used a rubberised canvas groundsheet, ex-army. It also stopped 303 bullets. We can do slightly better today.' Very true. I am assuming that you do clear your tent site of sharp and lumpy objects before you put the tent up: they both damage any sort of groundsheet and are uncomfortable to sleep on. The white groundsheet material just visible in some of my tent pictures is the heaviest (80 gm/sqm) and most robust material I have used, and one which has given good service. It was developed as a drape for surgical use, and is a guaranteed barrier against bacterial transfer. Well, anyhow, it is very waterproof! However, much of the weight is in the proofing layers, so the basic fabric is not much stronger than other waterproof fabrics I have. The "titanium" fabric (55 gsm) mentioned previously is utterly waterproof, but I hesitate to recommend it for snow conditions as it gets too stiff.
The fabric now used in America for many groundsheets is the 'silnylon'. This material is very tough, but it feels so light that one automatically worries. However field reports from America have been good, and I have been using it for several years now in the Blue Mountains with no problems. It is now my default groundsheet material. Of course, in the event of a disaster with a groundsheet, one can always patch it or replace it. A scrap of silnylon fabric and some hardware store silastic sealant works fine - allow several days for curing though.
Be warned that the current 'dry-look' silnylon is actually meant as a 'zero porosity' parachute fabric. It is not as waterproof as the older 'wet-look' silnylon. Unfortunately, the latter is no longer available. What this means is that after a few years you may find a silnylon groundsheet will let a very small amount of water to enter where you kneel. I am talking about a teaspoon or so. You can solve this by recoating the underside with a ,i>thin layer of silicone sealant. I have done this 9on a hoterl balcony in Italy - long story) and it worked just fine.
We have already discussed this to some extent under Pole Design. A bit more detail is given here for those who are curious.
The 7075 T9 alloy from Easton is is fairly reliable; the 7178 alloy Easton experiments with briefly is a bit brittle. I hsave had the 7178 almost explode once, and I believe Easton have stopped promoting it. The cheaper 7001 T6 alloy found on some other brand poles is weaker, and in principle makes the poles heavier. Those vendors say 7001 is as good as 7075, but they would say that, wouldn't they? The figures I have seen say it is not as strong. The other argument they trot out for the 7001 alloy is that it is a bit more forgiving when mishandled. Well, that may be true, but the stuff will still bend and break - just more easily.
The original common Easton 0.355" poles are quite heavy (45 g/m): manufacturers continue to use them because (despite being 7075 alloy) they withstand casual abuse moderately well. There are lighter Easton poles available: the 0.344" pole (34 g/m) is a bit more flexible but quite good, but the stiffer 0.350" 7178 pole (36 g/m) has given some problems when flexed a lot. More recently 7001 DAC poles from Korea have become popular with some manufacturers. The way they are made seems pretty good, even if the alloy is weaker. I suspect a combination of lower price and (historically) a very arrogant Easton company may be why some manufacturers have changed over to DAC. I have not been able to try the DAC poles myself, and they have never answered any of my emails, (so are they any better than Easton?) but I have moved on to carbon fibre anyhow.
This stuff is commonly used in those $40 tents you buy at Big-W and Kmart. Fibreglass works, but the poles are rather heavy. Bend them too far and bad things can happen: either they split or the epoxy collapses and they buckle. If you are looking to make your own lightweight tents, this is not for you.
You can get what looks like carbon fibre tubing from some Carbon Express arrows. Don't believe it: they are really fibreglass with a light dusting of black carbon fibre over the outside. They are a disaster waiting to happen when used as tent poles. I did try them once, thinking they really were CF, but they split immediately. I returned the rest of the unused arrows in a fury. I dare say they make fine arrows.
Pultruded Carbon Fibre (CF) tubing is available in a range of sizes, and can be bought from kite suppliers (eg Avia Sport from Kite Magic in Sydney). What the term means is that the carbon fibres have been pulled through the die as the epoxy is extruded. The stuff is hugely stiff and quite light, very good for kite spars and other things, but totally unsuitable for tent poles. Why? because as soon as you bend it a little more than you should it splits right down the whole length. Great strength along the axis, but no strength in the critical other directions.
Unlike a pultruded tube where the carbon fibres only go down the length of the tube, a wrapped-fabric construction features a woven fabric wrapped around a former. The 2D arrangemnet of the fibres makes a tube which is much more resistant to splitting, even if it is a shade less stiff. Fibraplex in America make lightweight replacement CF pole assemblies for commercial tents this way, and their tubing is slightly lighter at about 26 g/m. They also provide the correctly-sized joiners for their poles, and can provide some bends. Unfortunately, they don't supply the angles I want. There are other suppliers of fabric-wrapped CF tubing out there as well, but in general wrapped-fabric are much more expensive. The reason is that most wrapped fabric construction is done by hand. You take a former and wrap the CF pre-preg around it. That gives you a 'wrap' but not a very good one. Then you have to roll the tube across a flat surface a number of times to get the wrap tight. Of course this is possible, and it is done - but it remains a very piece-meal process using hand labour. This is expensive.

When Fibraplex stated making their CF tent poles their tubing was a bit too flexible for my liking. However, they seem to have upgraded the stiffness over the years, perhaps through improved rolling techniques, such that it is now (2009) pretty good. They aren't cheap of course.
I have found some CF tubing meant for arrows which is even lighter. It features a bi-directional 2D wrap: some lengthwise and some wrapped around, as illustrated above. The fibres wrapping around the tube are what make it so good: they are wound far tighter than you could ever get fabric around a tube. The stuff I use weighs only 19 g/m, and about as strong and as stiff as the Easton tent poles. I have stood on the tubing on rock and it survived: pretty good. I have even jumped on it while wearing joggers: it still survived. That's the strength of the wound fibres coming into pay. I have used this stuff for many years now, under some extreme conditios, and it shows no sign of damage. I even found just the right tubing (some Easton arrow shafting) for sleeving it for joins and reinforcing at the ends - very fortunate.

I suspect most of this stuff all comes from just one factory (Zhongshan Pulwell Composites, PRC) - and indeed from just one machine. Once you have such a machine, you can sweep the competiton off the floor so easily with both quality and price. To be sure, various archery companies all claim to have their 'own production facilities', but I strongly suspect those facilities are really this one machine. Be that as it may, the stuff works.
The carbon fibre poles do need just a little more care in handling than the aluminium ones: you don't belt them around. Bash an aluminium pole and it dents. Bash a carbon fibre pole and you can shatter some of the fibres. The break may not be immediately visible, but will weaken the structure. However, I have been using both the carbon fibre poles and the 0.344" Easton poles for some time with success. The reduced stiffness of the very much lighter CF poles has never been a worry: the guy ropes are more than adequate. Both sorts of poles are "not cheap" - but feel the weight!
As explained before, you can't bend CF tubing the way you can pre-bend aluminium, so you have to have to least one bend in the pole. The bend(s) have to be at the correct angle(s). At present I make my own bends out of stainless steel tubing. This is where there is a problem for the DIY fan: getting the material for the bends and shaping it. I have had to develop special tooling to prevent the tubing from distorting at the bends.
However, some people have used larger aluminium tubing as an external sleeve. The alloy has been much softer than 7075 of course, but the larger diameter has made up for the lower strength. And bending the larger tubing is easier as you can find a commercial pipe bender for the larger size.
If your design uses the right angles, you may also be able to buy some Easton elbows. Yes, Easton now make elbows of the right gauge. Buying these can be difficult, but you could try tentpoletechnologies.com to see what they have. Actually, they can make up the whole pole set for you if what you want fits in with their processes. Give them my compliments.

You will also need pole feet to go at the ground level. The bit sticking out goes into an eyelet on something spanning the floor of the tent, to keep the poles bent. The other end is meant to be tight inside the tent pole: machine the diameter carefully. Most times I use a flap or some tape attached to the corner of the groundsheet, always with an eyelet set in as shown. The correct size of eyelet helps of course, but finding these is not always easy. I make my own pole feet, but I think you can buy them from some of the American suppliers.
You need some bungee cord up the middle of the tubes, otherwise assembling the poles into a tent becomes either a farce or a nightmare. (actually, it is possible to assemble the pole and get it into the pole sleeve with bungee cord, but then the real nightmare is getting the pole out later!) You can use a full length bungee cord, or a short bit of strong bungee and have the rest of the length made from very light nylon string. You have to add a little weight for the joiners, pole feet and some string and bungee cord to the pole weight budget.
Pegs are a bit tricky. There's a whole range listed in the main section. In most cases you could leave them behind and use sticks or rocks instead. This does get difficult in the alpine regions where there are no trees and lots of snow grass - and sometimes a lot of wind. I have included pegs (7 gm each) which I made from (broken) Easton tent poles in some of the listed weights, but you can buy similar ones made by Easton at some shops. Alternately you can buy some angle aluminium pegs by Salewa which weigh about 13 gm each, or even thin titanium wire pegs from overseas which weigh about 6-7 gm each. They are my favourite. The Ti wire pegs don't hold as well in sand, but nothing short of a really long stick does anyhow. However, they are very, very hard and can be hammered into the ground past rocks. The orange ones do not get lost in the mulch when you drop them. (I have since painted mine a rainbow of colours to assist with recovery.)
I have looked at using large diameter Ti tubing split lengthwise to make very light but strong channels for snow camping, but the price was unbelievable. I also considered using folded Lexan anchors in the snow - it's unbreakable, but it turned out to be a little too flexible unless quite thick and heavy. And it was sop slippery it threatened to pop out of the snow at the wrong moment. The hard sheet aluminium anchors shown in the main sectionwere successful at holding, but a huge hassle with aluminium is getting it out of the ice in the morning. These days I use custom (ie MYOG) titanium snow anchors with great success.
This is well covered in the Shelter section. A brief summary is given here. The guy rope on many ordinary tents is awfully heavy. I have used thin Spectra string - actually fluorescent yellow Spectra fishing line rated at 250 pounds. Why yellow? Because it is very bright, so I can see it at night and not fall over it, because it shows up in the snow, and because, well, I had some. However, some trials in the snow with this sort of string highlighted an unanticipated problem. Some of these high-tech strings, and especially the fishing lines, are waxed together to help prevent fraying. This is an excellent idea - until you get into the snow. Then the sub-zero temperatures make the string very hard to manage and tension.
I tried using fluorescent pink nylon bricklayers string: it's light, cheap, a lovely colour and originally would (just) take a guy rope knot. However, the stuff which is available now is made in China and has a bad creep overnight, and also expands in the cold. My guy ropes kept going slack overnight! So that was dropped.
In the end I found that light Dacron kite line from (Michaels, Sydney) kite shop (unwaxed!) was just as good as anything else, and very light too. However, a problem which surfaces with the high tech fibres such as Dacron, Dyneema, Spectra, Kevlar or Vectran is that the fibres are so hard it is not possible to tie a functional guy-rope hitch in the small sizes. There is just not enough friction. I have had to use a small toggles instead. They are discussed in main Shelters page.
There is still one problem: I can't see white guy ropes very easily in the snow. Maybe I shall take a fluorescent marker pen to it. Alternately, I could import some special tent guy material from America - complete with fluorescent fibres or sparkly fibres or whatever. I haven't done so as the stuff is a bit expensive. You can see typical stuff at Backpacking Light.
You might ask whether any of these very light lines are strong enough for your tent. Well, the stuff I am using has a breaking strain of 70 kgf (150 lbf). Can you imagine hanging a 70 kg man off your tent? I thought not, so that argument is dead.
The zips are a problem. Your ordinary sewing shop (eg Lincraft) may have some zips up to 800 mm long, but the main doorway on these tents needs a zip just over 1000 mm long. To make things worse, it needs a zip with two sliders (like on a parka) and with the sliders having pulls on both sides and preferably non-locking. (Don't ask for "reversible": that's different.) The inner door on a winter tent needs a single light zip of about 2000 mm length or two of 1000 mm length. Dress shops are not a lot of use here. I like to use a #3 coil zip on the summer tents as it is very light and compact. The great big clunky zips you see on sleeping bags are too heavy: the same 'bombproof' thinking at work. Some of the overseas suppliers on the DIY page can help, but not many have the #3 zip (try OWFINC). What you can do is buy continuous lengths of zipper chain and separate sliders, and make up the assembly yourself - if you can find a source. Alternately, one might be able get the zips made up to order - but you need to buy a quantity of them.
Finally we have the all the thread, eyelets, bits of velcro and so on. You can chip away at the weight, but it does not do much good as it is not that large to start with.
For the very light silnylon fabrics I prefer to use a synthetic thread which is a little lighter than the common sewing thread found in sewing shops (eg Gutermann). A continuous filament polycotton of 100 - 120 gauge (eg Rasant 120) or perhaps a pure polyester of the same gauge (eg Serafil 100) is about the right weight, and can be found in some sewing machine shops. Cheaper poly-cotton or polyester-cotton threads may not be strong enough in the fine sizes, and caution is recommended! Rasant 75 and Serafil 80 are good for seams in silnylon which require strength. The Rasant is a lot easier to handle than the Serafil.
You should use a #60 or #70 sewing machine needle for the tents: nothing bigger. I favour the #60, but care is needed as it is very fine. Commercial sewers would use at least a #70 for speed and strength. I use a #70 for regions of reinforcment. You will need an "ordinary" sewing machine, not an over-locker. However, not all sewing machines can handle heavy threads and heavy fabrics, and this includes many modern ones. I found an antique black Singer which handles very heavy thread just fine. Curiously, it also handles very light fabrics very well. Such is progress?
One can buy eyelets from the bulk suppliers in bags of 1000, but you can also get small packages of various sizes in dress-making shops. You may need to shop around to get the right sizes: different shops carry different sizes at different times. Make sure washers are included for the back: without the washer the eyelet can pull out, damaging the fabric badly. Get brass ones: plated steel ones rust. You will also need the die set (and possibly the hole punch) they sell in order to get a good finish.
Bungee cord can be found in some dress-making shops and even in some bushwalking shops. Again, different brands have different degrees of strength and stretch, so check.
© Roger Caffin 6/6/2002, 20/06/2009, 21/4/2012, 16/07/2014