Contents
Send any comments to the maintainer Roger Caffin
Apart from the 'pop-ups' very few tents will stay up by themselves, especially in the mountains. They need guy ropes and tent pegs (called 'stakes' in America). Even the 'pop-ups' will need tying down in bad weather: they have been known to turn into paragliders or tumbleweeds, and end up kilometres away. In 'the good old days' we used hemp rope, wooden toggles and large steel bars hammered into the ground to hold up our canvas tents, but we can do a little better these days.
Some of the pegs shown here are home-made: the DIY section is spreading ... :-)
Contents |

|
The guy ropes on many ordinary tents verge on real rope, being awfully heavy and grossly over-strength. Such stuff begs to be replaced with something more appropriate. There is little point in putting a rope of 1000 kg breaking strain on a light tent that would be knocked over by a 70 kg body after all.
Selecting a material for a guy rope turns out to be not quite as simple as you might think, at least if you want to start pushing the weight down seriously and have the guy rope work well in bad weather. Herewith a list of strings I have tried as guy ropes, and how well they have worked. You should also check the section on nylon behaviour straight after this.
You might ask whether any of the very light synthetic lines is strong enough for you to rely on it. Well, the light Dacron kite line I am using has a breaking strain of 70 kgf (150 lbf). Can you imagine hanging a 70 kg man off your tent? I thought not. Be reasonable. However, be aware that the more advanced synthetics don't hold the conventional guy line hitch (below) either, and getting a grip on it yourself is not that easy! There is an interesting PDF report here on the "Comparative Testing of High Strength Cord" by Tom Moyer, Paul Tusting and Chris Harmston (used with full acknowledgement). The last two work for Black Diamond. The focus of this report is actually on the different knots which can be used on the modern synthetics, both fixed knots and various sliding guy rope hitches. However, I find that a lot of the ideas rely on the main rope being thicker than the rope making the sliding hitch, and the really thin synthetic cords seem to be just too thin. The next section deals with this: how to tension a guy rope.
I must add here that I had problems with 150 lb Spectra when it came to a combination of DIY titanium snow pegs and a storm all night with winds over 100 kph. Ice built up on the guy ropes (the ice was about 20 mm thick in the morning), which caused a lot of fretting around the sharp edges of the titanium, which eventually, at about 4 am, led to my losing six out of eight side guy ropes. Yes, the string broke! Fortunately the tent stayed up. We retreated when it got light; the storm continued for another day or two. My eventual solution to this is shown in the DIY - Titanium snow pegs section.
How often have you found your guy ropes slack in the morning? How often have you noticed that your tent fly has large drops of water on it in the morning and the fabric seems to be a bit slack where the water is sitting? There is a reason for all this.
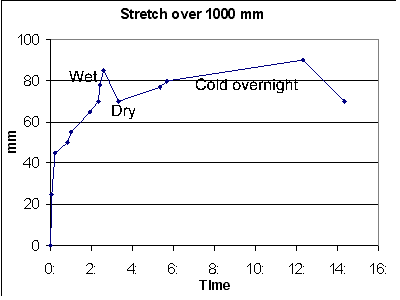
It has been suggested that nylon has a negative coefficient of thermal expansion - that it stretches when it gets cold. This is not true: it shrinks very slightly when it gets cold. But nylon does absorb moisture, and when it does the water molecules inside the nylon cause the molecules of nylon polymer to alter their shape slightly. Without going into technical details, water makes nylon expand, up to 0.7%. This can be quite significant on a guy line.
The graph to the right shows what happened in an experiment I ran late in the afternoon. It is based on a 1000 mm marked length of the cheap Chinese stuff under a load of 1.25 kg (a PET bottle full of water). I figured that this length is about right for a short guy rope. The 1000 mm length stretched over the first hour by about 60 mm, which is quite enough to give you a slack guy rope a little while after you have pitched your tent. Some of this stretch would have been due to relaxation, but not all of it. Then at about 2 hours I wet it down to simulate dew or rain: it abruptly stretched some more. It shrank as it dried out, around 3 hours. Overnight, as the humidity went up (this is Sydney!), it lengthened out again. Finally, when the morning sun hit and the string started to dry out, it shrank again at the end. This sort of behaviour is just not acceptable for a guy rope in a storm!
What to do about this? You can use short bits of bungee cord tied into the guy rope to take up the slack, but that does add weight. Or you can change material, to one of the Spectra/Dyneema class of strings - at a cost of losing the good knot behaviour. Many do the latter and just move the tent peg to adjust the tension. We cover this next.
Having pitched the tent and placed the pegs, you now have to tighten the guy ropes. How to arrange this? There are three ways: move the tent peg, use a guy rope knot on the string, or use a toggle on the string.
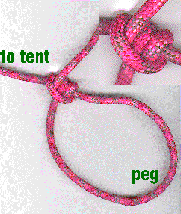
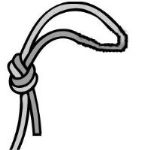
 tying this - actually I think there are several different knots for the same function all with the same name. Some of the other versions are very complex and therefore a lot more risky when you are working with a slippery bit of string in pouring rain at night. The version shown here is simple. Start (A) with a slip knot which has the free end as the movable bit. This is critical: do not have the fixed end of the guy rope as the bit which adjusts the length of the loop. Then (B) pass the free end around the peg and back through the loop of the slip knot. Pull on the free end to tighten the guy rope, pinch the slip knot with the free end passing through it between two fingers to lock it temporarily and pass (C) a loop of the free end under itself to make a lock. Then pull on that loop to tighten (D) the lock. To release the guy rope, just pull on the free end. Now, this does work well with nylon strings, but it can slip with some of the modern harder synthetics, just like the Guy Rope Knot.
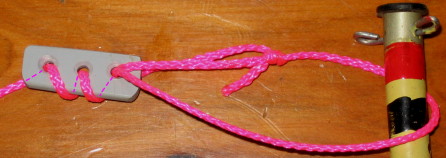
The version shown here is made from 3 mm thick PVC strip with 3 off 3 mm holes drilled through it. The picture shows pink nylon string (bricklayers string) wound in a spiral through the holes - see the pink dashed lines for the full path. The string then goes around the tent peg and back to the 3rd hole. This works quite well on light nylon cord. To adjust it you have to take the tension off the string before you can slide the toggle along. Don't grab where the string winds around the toggle however; grab the ends instead. It represents the conventional idea of a toggle at the peg end - see note above about tangles, and the PVC plastic used helps by being a bit 'sticky' under load. Harder plastics may not work so well as the string may not grip as well on them. However, this design does not have enough friction to work with the more exotic strings of Spectra and Dyneema.
It should also be noted that this design does not have any means of 'locking' the toggle in place, although I have never had it slip on me as long as there was some tension on the string. If you already have loose guys in a storm ... you might have a problem!
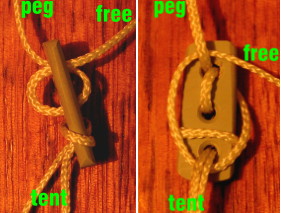
Like the above, this first version is uses some 3 mm PVC strip with 3 off 2 mm holes through it. Smaller holes are preferred here. This one will work with the Spectra and Dyneema strings, but uses a slightly more complex arrangement. Also, it is designed to be attached to the guy rope anchor at the tent so the guy ropes don't get tangled and the toggle stays out of the mud and snow. In this case the guy rope has a fixed loop at the peg end.
The guy rope goes through the two holes as shown in the left hand picture. Note that the 'tent' cord comes out on the same side of the toggle as the 'peg' cord. This is critical. In practice this gives about one and a half turns of distributed friction.
In use, the loop at the end of the 'peg' end is hooked over the peg in the ground and the 'free' end is pulled to tighten the guy rope. It may help to pull the guy rope anchor point on the tent out by hand a bit while doing this, to minimise tension on the toggle. When the guy rope is tight enough the 'free' end is 'wound around the toggle': it is passed between the toggle and the 'tent' cord and then between the toggle and the 'peg' cord. A single turn around the toggle is shown in the right hand picture. The tension in the guy rope will pull the 'tent' cord and the 'peg' cords against the toggle, and this will grab the 'free' end where it goes between those cords and the toggle. This puts an initial holding force in the 'free' end.
This initial holding force is quite low, so by itself it can impart only a low initial tension to the guy rope. However, this low initial holding force is then multiplied up by the distributed friction in the wrap around the two holes in the toggle, in the standard 'rope around a bollard' manner. The multiplying factor is a function of the total angle of wrap, which is about 1.5 revolutions here. This is a fair bit of wrap, and the multiplication factor is high. It should also be noted that as the tension in the guy rope goes up, so does the force between the 'tent' end and the toggle (ditto for the 'peg' end'). In a way, the arrangement increases its own holding power as the load increases.
Using very thin (<1 mm) 68 kgf (150 lbf) Dyneema string, this arrangement with a single winding around the toggle was able to support a load of 4 bricks (3.2 kg or 7 lb each) or 12.7 kgf. A load of six bricks (19 kgf or 42 lbf) tended to slip, but was well held when two windings were made around the toggle. Please note: very few (if any!) bushwalking tents would be able to handle anything remotely like a 19 kgf load being applied to any guy rope. This is similar to the weight of a very heavy pack! The string was quite able to handle the load, but where the 'peg' string (the one under tension) passed over the 'free' end, the 'free' end was squashed very flat! This is visible in the next picture.
In a moment of great foolishness during testing in my workshop, the string was unwound from around the toggle while 6 bricks were still being supported. You cannot hold this sort of string with such a big load: the string is far too thin and slippery. It started to run through the toggle, like an abseil rope through a brake bar. The heat from the friction melted the PVC, so grooves were forced into the PVC. At the same time the molten PVC melted the string, and the 6 bricks then descended smartly, one of them onto my foot. For this reason, it is a wise move to always take the tension off any toggle when adjusting it.
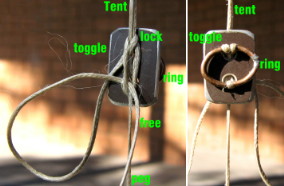
Not everyone has sheets of hard 3 mm PVC lying around, but you can also make this sort of toggle out of more readily available materials. Consider using any medium hard bits of plastic left over from a broken 'something' for instance. But don't use any soft plastics: they will wear out too quickly. For the one shown here I used a left-over from an aluminium window frame: they are made from a nice hard aluminium alloy. I drilled two 2.5 mm holes in it and once again rounded off the corners of the holes (and the square itself). Then I made a ring of 1.2 mm thick brass wire and soldered the ends together (mainly for neatness). The 'tent' string is tied to the ring and threaded through the top hole. The 'peg' string is threaded through the lower hole, through the ring, then back through the lower hole.
The ring diameter should obviously match the separation of the two holes. The round wire is quite good for the hard string, but obviously the wire should not be too thin. A slightly larger diameter wire would be nice. Don't use steel wire (eg a paper clip) as it will rust in the field.
If the initial holding force is still not enough, the 'free' end may be wound around the toggle once more in the same path. This will at least double the initial holding force. I have never found it necessary to use more than a double winding. Be reasonable: no tent guy rope is going to have the equivalent of six bricks hanging off it: neither the poles nor the fabric would take it. Well - maybe one or two brick's worth in a bad storm :-) Do remember that aluminium would get just as hot as PVC if the toggle was used as a brake bar.
The photos here show the guy rope under tension, and also show the string 'locked' off. Locking off the free end is not necessary if the guy rope will always be under constant high tension, but at a windy site this may not be true. The free end could come adrift when the guy rope goes slack, and in practice the tension in a guy rope is never very high. Don't make such a locking hitch more complex, as it will be almost impossible to undo later, especially in bad weather.
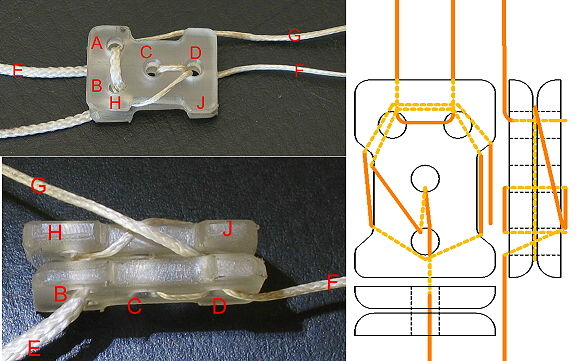
Inspired by the previous versions I decided to try to make an even better toggle. The photo here shows the design I currently use on my summer and winter tents: the design has taken a hammering for many years without complaint. It uses two identical bits of plastic, although you could equally use some thin hard aluminium. While the shape is somewhat of a 'dog bone', I have also made the toggle almost completely round, and it worked just as well. The corners on the dog-bone shape just make hooking the cord bewtween the two bits easier.
Cord E through holes A & B in both parts of the toggle is static and goes to the tent. I usually make the cord E just a short loop and knot that through a loop on the guy rope anchor tab. Cord F goes to the tent peg, while cord G is the free end of F. After going through the holes C & D the free end G is wound around between the two bits of the toggle.
The idea is that the loop of cord E and the winding of F through holes C & D make the two bits of the toggle press together very tightly. When these two bits press on the free end G they grip it, and the greater the tension on the guy rope the greater the grip on the free end G. But as soon as you take the tension off the guy rope and unwind the free end G from between the two bits of the toggle, you can adjust the length of the guy rope very easily. For further details about this, make one for yourself and try it out.
No matter how you adjust the length of your guy rope, there are going to have to be some knots in it. What sort of knots? It turns out that while nylon string (like the pink or white brickies line) will take many knots very nicely, the harder strings won't. The knot may run under load. Worse still, some knots make the string much weaker and cause an early unexpected failure. I will list some common knots here: Google them if you want more information.
As mentioned at the start of this page, every tent needs guy ropes in bad weather - but some thing is needed to anchor the guy ropes. You can use sticks and rocks, but these are not always readily available. Enter the humble tent peg. We will consider pegs for a range of conditions here, and in fact you will probably find you will need several sets of pegs to handle the full range of conditions you can encounter. I would add that Snow Peak offer forged steel pegs which can be hammered through asphalt! Apart from that, the following conditions may require different pegs, and we will explain why.

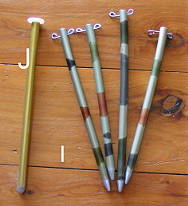
In this case we can get a wide range of pegs into the ground. However, to get a good amount of holding power the peg may need to be a bit more than just a length of wire. The pictures here shows a range of such pegs, some of which (labeled 'RNC') were home made. There is little reason why you could not make them too. The 'Comm' column says whether you can buy such pegs. The term 'Al' means aluminium - a common peg material these days. Some of these pegs actually belong in the next category: blame the photographer.
| Name | Weight | Comm? | Comments | |
|---|---|---|---|---|
| A | Macpac | 21 g | Yes | Curved Al, fairly rugged, good holding power in soil, a little soft |
| B | Easton | 14 g | Yes | Tubular peg of Easton tent pole tubing, 200 mm long, 7075 alloy, Al head |
| C | RNC | 8 - 10 g | No | Tubular peg of Easton tent pole tubing, 150 - 200 mm long, 7075 alloy, nylon head and point |
| D | BMW | 6.5 g | Yes | Titanium wire, see next category |
| E | Salewa | 13 g | Yes | 7075 T6 alloy angle about 10 * 10 mm wide by 175 mm |
| F | Plastic | 13 g | yes | 10 mm * 12 mm by ~130 mm long, strong enough for hammering, a little short |
| G | Al Wire | 15 g | Yes | Robust alloy, 6 mm dia by 160 mm long, almost strong enough for hammering |
| H | Paddy Pallin | 15 g | (yes) | 1960s era steel wire, 170 mm plus loop, very robust: have we advanced at all? |
| I | RNC | 4 g | No | Tubular pegs of Lighter Easton arrow tubing, 160 - 180 mm long, 7075 alloy, stainless steel wire 'head', integral point |
| J | RNC | 14 g | No | As for C, for comparison |
It is worth noting that in most ordinary soils anything much over 200 mm long is probably wasted: the extra length does not really give extra holding power unless the top layer of the soil is quite loose. However, this is one case where it is better to have the extra 20 mm and not need it than to not have it and need it.
The original steel wire pegs (H) I bought with a Paddy Pallin A-frame tents in the very early 1960s still work very well under most conditions, and make you realise how excessive some pegs are today. One cannot help thinking that the inspiration (or source maybe?) for these pegs could have been a bit of light 10 gauge (1/10" or 2.5 mm) fencing wire, "found" locally. You would think that steel would be too heavy to compete today, but my original Paddy Pallin pegs were 200 mm long and weighed only 15 g each. Hum - have we gone backwards with all this high-tech stuff?
You can get thicker aluminium wire pegs today with a nice hook on one end, but they are 6 mm thick, presumably to compensate for the reduced strength of aluminium, and they weigh 15 gm. I suspect the alloy used is not very good - it keeps the price down. It is curious that these are actually as heavy as the old steel ones! Granted, they are a little larger.
I was amused (a bit) by the existence of plastic tent pegs. They range from large and heavy (not shown here) to small and light (F). The one shown is made of some plastic which seems to take a fair bit of hammering. The increased cross section does make them harder to get into some soil of course, but it may also add to their holding strength. Unfortunately the sort shown is a bit too short for reliable use in most soils.
The key thing here is that the peg has to be hammered into the ground: a mere push won't work. Some of the pegs listed above can be hammered, but the problem is often that they simply cannot fit into the ground between the rocks. Enter the titanium wire peg shown as D in the picture above. This peg is almost unbendable, even under hammering. (I can bend them, but it is very hard.) They are very light but extraordinarily strong. I have hammered them into very rocky ground where the tubular pegs would not go - literally hammered with a rock that is. More often, I find that I can push them into the ground easily where fatter pegs would require hammering - or hurt my hand.
Some of the originals were once made by SimonMetals in America, but I can't find that company any more. Others, either plain (US$13.49 for 6) or painted a bright orange (US$23.99 for 6) so you don't lose them (it works), are made by Bozeman Mountain Works and come via Backpacking Light in America. I thought they were a bit pricey at first, but I have since bought more because they work where nothing else works. I worried at first that the thin wire might mean too little holding power, but that has only really happened in sand and snow. I found the unpainted ones I had were very easy to lose if you dropped them in the bush. The orange ones are much more visible, but I have since painted black and blue stripes on mine to enhance the contrast further.
Several versions of these were made from broken aluminium tent poles (mainly Easton tent pole tubing) and bits of machined plastic. For the first one I scavenged broken tent poles from my local gear shop - they had a bin full. The pegs need a point at one end and a bit of a flange at the other to be convenient, and I make them about 150 - 180 mm long. I made a number of these, and they weigh between 8 g and 11 g each, depending on the length. They are very rugged and can be thumped into the ground with some (careful) degree of force. Using a good hard nylon for the top cap allows some thumping with a rock, but be a bit gentle.
The 'camo' version (I) was made from far lighter Easton arrow shafting, and use the existing 'point' which comes on arrow blanks. (The 'point' is actually where the nock goes, at the rear of the arrow.) They were offcuts from another project. The plastic head is still there, to allow the end of the peg to be hammered into the ground. Yes, done with discretion (and a hard nylon or Delrin) even these tubes will take some hammering. The problem was in getting these pegs out of the ground: a few times the plastic top cap pulled out of the tube. So I added a bit of stainless steel wire as shown, and this both retains the guy rope and gives me something to hold onto when I pull them out. A loop of strong cord on my tent peg bag is an excellent way of hooking onto these pegs to get them out. These home-made designs are a good choice for ultra-lightweight enthusiast.
Easton actually sell such pegs (B) made from their own tubing, but their version is larger and weighs 13 gm each as it has a heavy head.
Well, forget about the metal pegs here. Find some dead sticks about 400 mm long and 20 mm diameter, and shove them into the sand. Or use smaller sticks and some good rocks out of the river. End of story.
It may be nice to have your tent fairly secure in the forest, but in the snow fields it is crucial! However, snow is not like soil and it's not like sand either. Pegs for snow use have to be somewhat larger as the snow is not as 'strong'. Wire pegs are of no use in fresh or soft snow, and even the tubular ones are of little use. A larger area is needed. This leads to two sorts of pegs being used in the snow: 'channels' and 'deadman anchors'. In real ice ... you may want to use tubular ice screws.
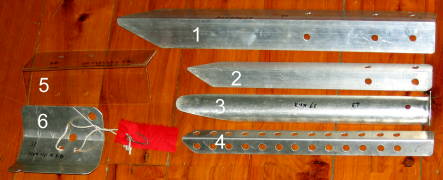
Snow pegs go right into the snow, with only a very small amount left sticking out. After all, anything above the surface is wasted. But first stamp the snow down a bit before you insert any snow peg or anchor, and also leave it for a few minutes to harden. Yes, the snow will usually harden after you have compressed it: the process is call 'firnification'. If the night is cold the snow will harden further and possibly freeze as well if it was wet in the evening - a common sitution in Australia. With any angle peg in the snow it can help if you push the guy rope down under the top surface of the snow to get the load distribution a bit more centered on the holding area.
As mentioned above, snow pegs come in two main categories: channels or long ones of fairly conventional shape and deadman anchors or square ones. The origin of the term 'deadman anchors' escapes me. (Bury a frozen dead man in the snow?) Because deadman anchors are short they usually have to be put right into the snow, and this means you need some sort of string and hook for an attachment point. Some examples are as follows.
| Name | Weight | Comm? | Comments | |
|---|---|---|---|---|
| 1 | RNC | 116 g | No | Al angle, 40 * 40 * 1.6 mm, 400 mm long, far too big for Australian conditions (too small for powder?) |
| 2 | RNC | 52 g | No | Al angle, 20 * 20 * 1.6 mm, 300 mm long, a bit large but robust and suit tunnel ends |
| 3 | ? | 43 g | Yes | Curved Al channel 37 mm wide, 300 mm long, as for 2 |
| 4 | RNC | 43 g | Yes | Folded hard Al sheet, 20 * 20 * 1.0 mm, 300 mm long, perforated, adequate under most conditions, slim enough to go into alpine soil, but can bend when frozen in place |
| 5 | RNC | 29 g | No | Lexan anchor, 52 * 52 * 1.6 mm, 170 mm long, (add string and hook), high holding power in snow but too weak for icy conditions |
| 6 | RNC | 34 g | No | Hard Al sheet 110 * 110 * 1.0 mm, with string and hook, high holding power, more rugged than Lexan, but can be damaged by stamping |
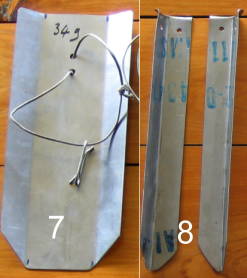
| 7 | RNC | 34 g | No | Titanium sheet 80 * 175 mm, 0.55 mm thick, with string and clip, to make deadman anchor |
| 8 | RNC | 18 g | No | Titanium sheet 38 * 190 mm, 0.55 mm thick, folded top edge, to make angle peg |
The overnight freezing of the snow can be a major problem as snow/ice and metal bond together quite well, making frozen pegs very hard to extract. For this reason you may want to leave just a little bit of any long peg sticking up: 10 mm would do fine. In the morning you carefully stomp your boot on the protruding bit in the direction of the peg, pushing the peg further into the snow. This breaks the snow/metal bond and lets the peg slide out fairly easily. Of course, you have to make sure the peg can take being stomped on, and ultralightweight snow pegs can be suspect here. The Lexan anchor (5) proved to be a bit too light for endurance, and had another unexpected defect: there was no bond between the Lexan and the snoiw, so the peg could slip out under load if not put in at the right angle. The Aluminium anchor (6) was better, but I still found it could be crumpled under a heavy stomp on a cold morning. It took me half an hour to get all those pegs out one morning near Smiths Lookout!
The alternative to leaving a bit of the tent peg sticking out is to bury it completely. This is actually better as the peg is now protected from the sun. That is, it cannot get warm and melt the surrounding snow, or, worse still, collect rain water and melt the snow. Both leave the peg loose. Of course, melted snow in the evening often means solid ice in the morning, which can make extraction almost impossible. yes, the snow will ice over the top of a buried peg, but not as much. You just need a strong peg (or an ice axe) to chip some snow away - just enough to let you do the stomping bit.
Most of the snow pegs shown here are made from aluminium, and making your own is very simple. However, a word of caution is in order. The early morning snow/ice environment is rather hard, and your pegs need to take a bit of punishment as you extract them. A lot of aluminium sold in local hardware stores is 'architectural grade' or commercially pure aluminium. It is not a hard alloy. Pure aluminium is soft and bends ever so easily. Some extruded angle may be a little harder, but don't rely on it. If in doubt, select a thicker grade and put up with the slightly greater weight. Anyhow, very ordinary tools can work aluminium, and it is quite cheap. Lengthwise bends (as in the angle pegs) add greatly to the strength of the design. In short, I have used aluminium snow pegs, but I found them lacking.
What you really need is an alloy metal which is extremely stiff while being very light. Enter titanium, especially the 6Al-4V alloy. You can buy titanium snow pegs from America - at a huge price, but you can also make them yourself. You can import sheet aluminium from a couple of places in America: it is often sold on eBay, and Titanium Joe sells small affordable 'offcuts' of all shapes and sizes. He will ship to Australia. The anchor (7) and angle peg (8) were home made out of 0.020" 6Al-4V sheet I imported.
This stuff is so hard that the titanium angle pegs slice right into hard soil and alpine grass. The titanium wire pegs can be hammered into rock - well, into cracks in the rock anyhow. Actually, the metal is so hard that bending it requires a real bender, although cutting the sheet was fairly easy with good sharp tin-snips. Bending was done with a real bender (but into a curve, not a sharp corner!), and the folded top end on the peg (8) was done hot (LPG torch, ball peen hammer) in a special clamp. It adds a lot of strength as well, stops the guy rope from flicking off the peg, and allows me to stomp on the peg without damaging either it or my boot. I can also hook a peg under the folded end of a frozen one to help pull the latter out. a full description of how to make these pegs can be found in a Backpacking Light article I wrote, and in a follow-up article. However, a small subscription is needed to read them.
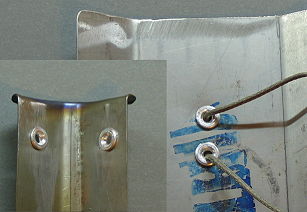
However, the original angle titanium snow pegs had sharp edges, and after a night spent almost on top of Mt Anton (KNP) in a howling storm (don't ask) with 100+ kph winds all night, six out of eight of the 150 lb Spectra guy ropes frayed to the point of breaking. True, they were coated with a 20 mm tube of ice at the time, but they still frayed. Fortunately my 4-pole tunnel tent was pitched end-on into the wind and the dead-man end anchors held. We retreated at 6 am in a total white-out - an epic in itself as we could not see the cornices. Back home I modified both the tent pegs and the guy ropes, such that this would never happen again.
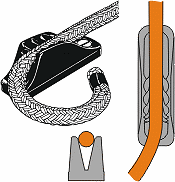
The sharp edges on the pegs were eliminated by drilling holes at the tops of the pegs and putting aluminium eyelets or pop-rivets in the holes. The pop-rivets were converted to eyelets with a special punch. Then I threaded the guy ropes through the eyelets. The original guy ropes themselves (150 lb spectra) were replaced by composite guy ropes: I threaded new 150 lb Spectra string up inside tubular 300 lb Dacron kite line. I didn't really need the extra strength; what I wanted was the extra thickness. The thickness, and the softer nature of the dacron, allowed me to use CL266 Mini-Line-Loks from Clam-Cleats as toggles. Since the guy ropes were now attached to the tent pegs permanently, I made them hook onto the attachment points on the tent. That means they can be detached. This has the extra advantage that I can fold the tent up (in a storm) without getting the guy ropes all tangled up. (Guy ropes always get most tangled when the weather is really bad.) Then I bundle all the pegs together and wind the guy ropes around the lot. Unconventional, and more bulky perhaps, but it works just fine.
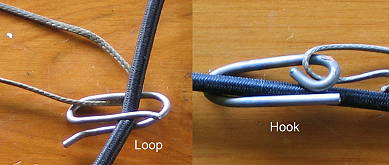
The end anchors will end up under the surface of the snow, and you need something to hook the bungee cord (or whatever) to. You also need to be able to find the anchor in the morning. The solution I use is to put a loop of Spectra string through the middle of the anchor, as shown in (6) and (8), and to put a hook of some sort on this loop. The attachment point is in the middle of the anchor to avoid pulling it sideways out of the snow. This means that when I put the anchor into the packed snow I have to poke the string down into the snow as well.
Why Spectra? Because the metal is hard and the ice is hard and when you are stomping around trying to get the peg out in the morning ordinary nylon tends to fray. For Spectra string I used some 300 lb Spectra Powr Pro fishing line from Innovative Textiles, but there is probably a range of suitable strings at a good fishing shop (or maybe a kite shop). Tough as it may seem at home, even the Spectra string is far too weak to be safely used for extracting the pegs from the ice.
On the string there is a hook. You can use a simple hook of course, but the guy rope or bungee cord (at the end of a tunnel tent) can come loose from a hook, especially under trying conditions. These days I use a 'closed hook', and two sorts are shown here: a 'hook' and a 'loop'. In each case the hook space is closed: the bungee cord (shown) cannot escape easily. But the closure has curved lead-ins so you can force the guy rope of bungee cord into or out of the hook space.
The hooks shown here are made of 2 mm titanium wire for strength. You don't want the hook opening up under load in a storm! But stainless steel spring wire of a similar size would do if you can find it. Don't use ordinary spring steel wire: it will rust. You may need to use heat and large round-nosed pliers to make the bends as the wire is stiff and resists bending how you want. (It will however bend in the wrong direction quite easily... Practice is needed.)
You will notice on anchor (6) what looks like a flag of red nylon fabric attached to the string. Yes, that's a very good idea in the snow. The red flag will help you find the buried anchor in the morning, and it weighs 'nothing'. Heat cut the fabric to weld the edges to stop fraying.
© Roger Caffin 1/May/2002, 7/Dec/2006 28/July/2008 14/April/2009 29/Sep/2009